R Package Guide
R packages are great in organizing all material such as source code, data and documentation belonging to a certain project into a standardized structure. This structure can be extended and together with some tools such as Rstudio and devtools, it provides great functionality.
Other Guides
The ultimate guide to R package development is the document Writing R Extensions that comes with every R installation and is part of the help system in R. Hadley Wickham has a book out on R Packages which is also available online.
The shortest description I have ever seen is the one on Hillary Parker’s blog. I consider her blog post to be the minimal guide to constructing an R package. Some of the function calls have change though since the blog post was written.
Something in between all the above mentioned references is Karl Browmans R package primer. I like his tutorial, because it explains many things very well, but it is still reasonably sized.
Why packages
Whenever I start a new project, I either create some new notes in Evernote, or I create a new directory somewhere on my harddrive or I start a new repository on github or I do something else. The problem with that rather chaotic approach is that a few weeks after the project gets started, someone else including future me, has enormous difficulties in understanding all the material that is available for that specific project.
Organizing everything into a project can help remedy that. Creating a package is very simple when doing it inside RStudio in connection with an RStudio project and when using the functionalities of package devtools. Once a package is created a standard structure of files and directories is given and source code, documentation and data are all stored in a given location inside the package directory tree.
Let us get started
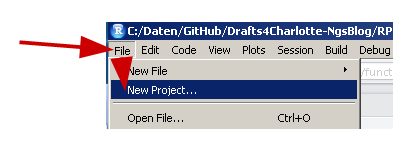
In RStudio a package is started by creating a new project. Use the menu File > New Project
This starts the process of creating a new project in RStudio. The next screen shows three available options available for project creation.
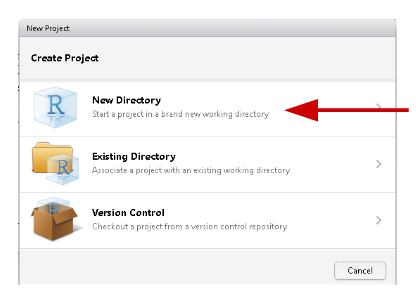
The first option New Directory is used to start a new project from scratch in a new directory. The second option adds project-specific properties to an existing directory. Option number three allows the user to checkout or to clone a project from a version control repository such as github.
Start from scratch
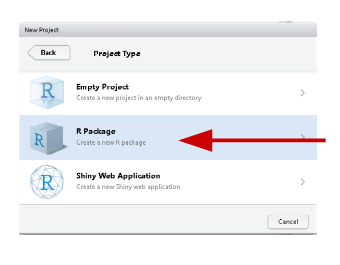
In our example shown here, we start a new project from scratch using the first of the three project creation options. This brings up a window with three new options from which we choose to create a New Package
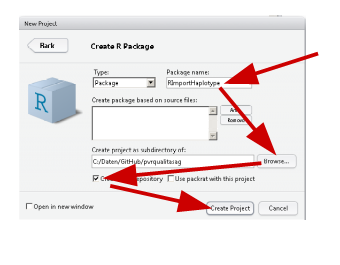
For our new package, we have to specify a package name. Optionally, the directory where the package should be stored can be indicated and with the check box Create a git repository checked, an empty git repository is created.
Congratulations
That is all, a minimal package is created. Besides a Hello world function there is not much more functionality available so far. But that is easy to change.
R functions
All R-functions should be stored in package subdirectory R. The functions should be documented using comments that follow the roxygen2 format specification.
Based on those comments documentation in the Rd format can be generated using
devtools::document()
Vignettes
Vignettes are more extended documentation like articles that describe in more detail the functionality of the package components. A vignette document is created using
devtools::use_vignette(name="myvignette")
This creates subdirectory vignettes if it does not exist and in that subdirectory it puts a template of a R-markdown document called myvignette.Rmd. This template can be changed to the desired content of the description of our package.
Testing
Before installing our package, we would like to test it first. The namespace of our package can be loaded using the command
devtools::load_all()
This simulates installation of the package and loading the namespace. Hence all functions become available in the current R-session.
Pushing local repository to GitHub
So far all changes inside our projects were only committed to the local git repository. This is fine for purposes of version control. But, everything becomes much more interesting and fun, when we start sharing our code with others. One of the repositories that is famous for sharing code is GitHub.
Hadley Wickham’s book on R packages has an excellent description on how to synchronize a local repository with GitHub. The description in section Synchronising with GitHub assumes that you as a user alread have an account on GitHub. That can easily be created when opening the main website of GitHub on https://github.com.
sessionInfo()
## R version 3.2.3 (2015-12-10)
## Platform: x86_64-w64-mingw32/x64 (64-bit)
## Running under: Windows 7 x64 (build 7601) Service Pack 1
##
## locale:
## [1] LC_COLLATE=German_Switzerland.1252  LC_CTYPE=German_Switzerland.1252
## [3] LC_MONETARY=German_Switzerland.1252 LC_NUMERIC=C
## [5] LC_TIME=German_Switzerland.1252
##
## attached base packages:
## [1] stats     graphics  grDevices utils     datasets  methods   base
##
## loaded via a namespace (and not attached):
##  [1] magrittr_1.5    formatR_1.2.1   htmltools_0.2.6 tools_3.2.3
##  [5] yaml_2.1.13     stringi_1.0-1   rmarkdown_0.8.2 knitr_1.12
##  [9] stringr_1.0.0   digest_0.6.9    evaluate_0.8